Here's a good pattern for jewelry engravers who are looking for something that sparkles like diamonds and fills a small area like the sides of a ring. It also looks great surrounding a flush set stone or bordering pave setting. But don't think this can only be engraved on jewelry because it can look great on guns or knives as well.
I use a 120° graver and a round graver for this border. My round is made from an old beading tool. Check this tutorial to learn how to make one, but any appropriately sized round graver will work. |
|
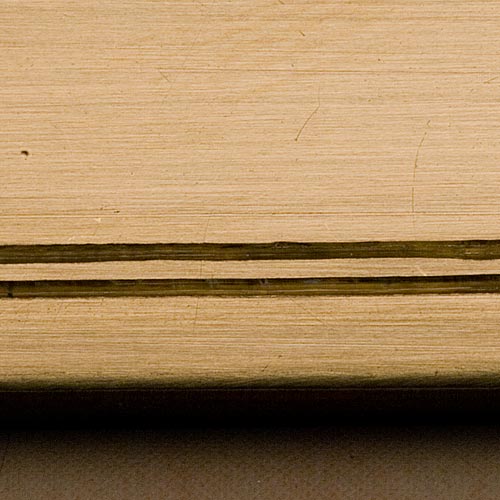
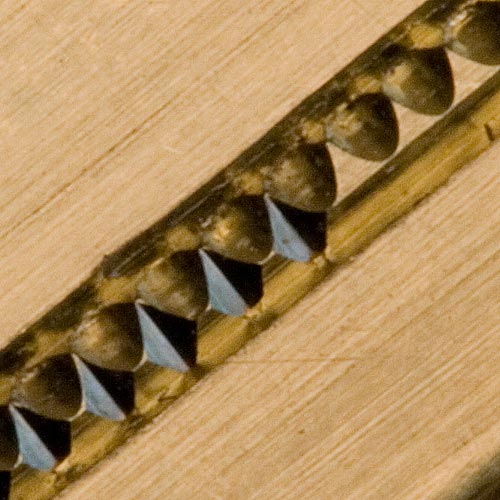
| Two deep lines are cut with a square graver. To achieve the depth I need, multiple passes were made with the gravers until the correct depth was reached. I'm sorry I have no way of measuring the depth, but I started with two scribed lines 1.5mm apart, and cut to the inside of those two lines to make these borders. If these lines are not deep enough the cuts in the following steps will simply not work as the chip will not be able to break free. As my friend the late Robert Whiteside would jokingly say (in his best Arnold Schwarzenegger voice), "We don't want no GIRLY CUTS!" |
|
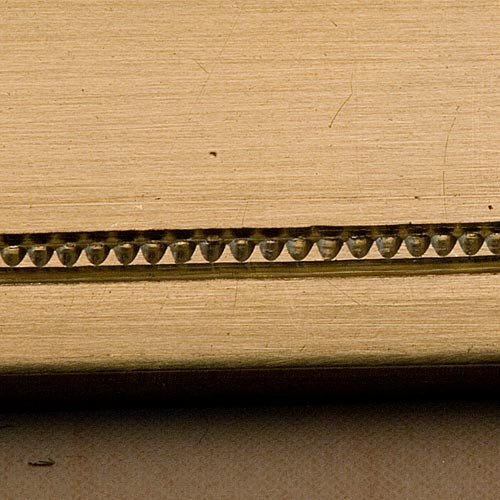
| Starting at the top edge of the strip of metal between the two border lins, the round graver enters the metal at a very high angle and cuts downward to the bottom of the facing line. Keeping the graver polished will result in mirror-like cuts that sparkle with life. This is a brass practice plate, and the cuts are not nearly as bright as in precious metals. I cut this border by eyeballing the distance between the cuts, but measuring and marking off is certainly ok. Not the small triangular piece of metal left between the round graver cuts. This will be cut away in the next step. |
|
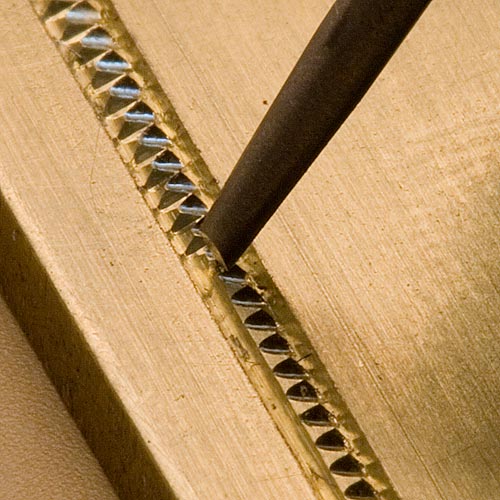
My polished 120° graver also enters at a steep angle to cut away the little triangle islands of metal left between the round cuts. I aim for the bottom of the line which gives the Nick & Round a deep, carved look.
|
|
| A closer view shows the nicks and round cuts. Note how all cuts reach the bottom of the cuts in the first photo. By cutting the lines deep enough you can avoid crashing into the sidewall as the nick's and round's chips break away freely. |
|
Because of its reflectivity, this is a very difficult job to photograph. Hopefully this shot will give you an idea of how the completed border looks.  |
| Engraving done with a GRS GraverMach with Airtact. |