|
In today's world of hand engraving, photography is a necessity, not an option. With fantastic digital cameras, editing software, and numerous lighting systems made especially for jewelry and small object photography, there's never been an easier time to get on board and shoot world class photos of your work.
More than the camera itself, proper lighting is the key to producing professional quality photos. Photos shot with correct lighting and an inexpensive point-and-shoot camera will be far superior to those shot with bad light with a $5000 professional camera.
There are many lighting options available in various jewelry supply catalogs. Some are inexpensive and some cost a small fortune. If you would be happy with the quality of photos you see on MasterEngraver.com, then you can get similar results for very little money.
My lighting setup consists of a Chimera Pro II light bank, size XS (extra small). This little light bank provides smooth, even illumination with no hotspots, and is reasonably priced at $99 plus $33 for the speed ring. This light bank is basically a black nylon box that's held open by four flexible arms, similar to a camping tent. The black plastic hub that holds the four arms is called a speed ring, and is made to accommodate flash units made by various manufacturers which flash inside the box. Flash is not very desirable for this type of photography, so I use a 500w photoflood bulb which gives me a what-you-see-is-what-you-get setup.
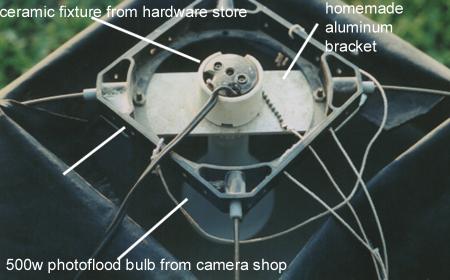
To mount the bulb, you will need a ceramic light fixture which is available from your local hardware store. A ceramic fixture is the only type that can survive the intense heat generated by the 500w photoflood bulb. Don't use anything except a ceramic fixture. Mine has a pull chain on/off.
Mounting the fixture to the speed ring is relatively easy. A small piece of aluminum with hole drilled for the fixture and bolted to the ring serves as a sturdy mount. Keep the flaps open to allow heat to escape.
The completed light bank can be suspended from the ceiling or temporarily hung from the wall or a makeshift stand.
Order directly from Chimera - 888-444-1812
Chimera Pro II, size XS (extra small) - #1510 $99
Speed ring #2416 $33 (this speed ring has a 1/4"-20 insert which can be used to mount to a boom, tripod, etc).
USING THE LIGHT BANK:
Turn the light on and position the subject about a foot below the white underside. The subject will reflect the white surface and engraved detail will be very apparent. Position your tripod mounted camera and shoot down at an angle to the subject. If you think of the subject as a mirror, and that you're photographing that mirror, the lighting will begin to make sense. If the mirror reflects the room, walls, or other surroundings, then the photo will look terrible. If the mirror (your subject) reflects the smooth white underside of the light bank, you are on your way to exceptionally fine photos.
Flat objects such as shotgun actions, custom knives, pendants, etc, can be very easy to photograph as they reflect the underside of the light bank perfectly. Round objects such as baby cups, rings, bracelets, etc., usually require a bit more setup. Try placing white paper reflectors around the subject until you kill the non-white areas the object is reflecting.
There are also inexpensive light cubes which are enclosed nylon boxes with a camera opening. These can be very effective for subjects with rounded surfaces. Lights are placed outside the cube and the inside provides a diffused light with a white reflective surface. Be aware that these cubes can sometimes make an object look flat, so repositioning the lights or adding a slightly shaded area can really bring improve the image.
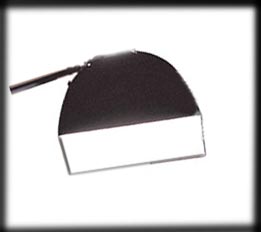 
The Chimera Pro II (top) with speed ring detail (above).
|
CAMERAS:
For over 20 years I shot both 35mm and 4x5 film cameras. For engraving, I now shoot a Canon 20D and 150mm macro lens. While this is an expensive combination, there are many photos on my site that were shot with very inexpensive point-and-shoot digital cameras...many even pre-megapixel cameras. Don't think you have to spend a fortune on a camera because you don't.
When selecting a digital camera for photographing engraving, here are a few things to look for:
1.) The camera should have some level of manual control, such as aperture priority and the ability to change ISO.
2.) It should have close focus (macro) capability.
3.) It should have sufficient resolution of 5-megapixel or greater.
Nikon Coolpix cameras are well known for their close focus capabilities and manual controls. I shot many photos with a CoolPix model 5400 which have appeared in magazines, catalogs, and large posters. The 5400 has been replaced by newer models, but it's still a capable camera for shooting engraving, and an eBay search will probably turn up many used ones at very attractive prices. Earlier Coolpix cameras (3 and 4MP) are also excellent for close-up work and can be had for very little money, but 5+megapixel cameras will produce larger, sharper prints.
When using point-and-shoot cameras, set camera for APERTURE PRIORITY and use the smallest f-stop (highest number). Also set the ISO to the lowest number for minimum grain and noise and maximum sharpness.
Handheld shot with a $249 Canon A620 7.2MP camera. Taken
with makeshift lighting at the workbench during a trade show in Moscow. |
DSLR:
The digital single lens reflex camera is the best choice if the budget allows. These cameras have interchangeable lenses and a host of manual and automatic controls. For many years the DSLR was prohibitively expensive and used exclusively by journalists and other pros. Now days the DLSR is very affordable and the images they produce are absolutely fantastic. Canon and Nikon have always been the world leaders in 35mm film cameras, and now they hold the DSLR market share. Either brand would be an excellent choice, but for what it's worth, the Canons are producing some of the cleanest, noise-free images imaginable. If you're not familiar with the term noise, it's tiny specks of color where there should be none, and is usually a result of long exposures or high ISO.
When using the DSLR, set the camera on aperture priority and make test shots starting around f16. For more depth of field, choose a smaller f-stop (larger number). While smaller apertures provide greater depth of field, they are rarely the sharpest. Most lenses have a sweet spot at about f8. Shots made greater than f8 can have noticeable lack of sharpness, especially as you get closer to minimum aperture (smallest lens opening). As you can see, there are trade-offs, and quite often you are forced to use higher f-numbers in order to obtain greater depth of field.
METERING:
With point-and-shoot and DSLR cameras in aperture priority mode, the aperture will be fixed and the shutter speed will float as determined by the camera. Most likely you'll have to compensate for over or underexposure, but this is a quick and easy adjustment. Shooting in manual mode is also fine. Use the camera's metering system to get you close to proper exposure, then compensate as needed once you view the test images. Shooting a shiny object on a black background can really fool the camera's meter, just as shooting a dark object on a light background. The good thing about digital is that you can review the images instantly, make adjustments and reshoot, and have perfect images in just a few minutes.
TRIPOD:
Use a sturdy tripod for 100% of your shots, and avoid cheap department store tripods. Don't waste your money on them. With film cameras, a cable release eliminated camera shake for the long exposures encountered with closeup photography. Today's DSLR's use an electronic cable release which is far better than the mechanical one from the film days. Get one and use it for 100% of your shots. If your DSLR allows the mirror to be locked up prior to exposing the image, do it. Mirror slap can cause fuzzy pictures at shutterspeeds below 1/15th second. If you don't have an electronic cable release or your camera doesn't accept them, then use the self-timer to expose the image. This will eliminate camera shake, and almost all cameras raise the mirror a second or two before the sensor is exposed when using the self-timer.
If you've read this far then it tells me you're serious about shooting quality photos of your work. If you're confused or getting cold feet with all the details of cameras, light banks, f-stops, cable releases, and tripods, don't worry, because you can definitely do this. As far as I'm concerned, you have no choice other than to pay a professional photographer hundreds of dollars to photograph your work. With proper light and a decent digital camera with some level of manual control, you can be shooting images that will be equal to or better than what you see on my site.
Some of the excuses I hear from engravers who don't photograph their work:
Excuse - "I don't know anything about cameras"
Response - If you learned engraving, you can learn to use a camera.
Excuse - "I'm computer illiterate...I can barely check my email."
Response - Instead of watching TV, devote some time to learning basic photo editing software.
Excuse - "I would, but I'm too old to learn all of this newfangled computer stuff."
Response - That's nonsense. You're never too old to learn.
Without quality photos of your work, you are severely limiting your ability to make money with engraving, assuming that's important to you. 
|